This post was most recently updated on August 2nd, 2024.
3 min read.A’ight, it’s a clickbait title, but it’s also almost true. See, if you’re like me, you’re also sick and tired of Windows shoving Edge and Bing down your throat every time you search for something on your PC or click a system link? Do you want to find your files and apps (and only YOUR files and apps, not someone else’s stuff) without having to wait for Windows to load a bunch of irrelevant web results and MSN news stories? Do you value your privacy and don’t want Microsoft to track your every keystroke and query?
Well – there isn’t really much I can do to help with the last item on the list, but if you answered yes to any of the other questions, then you need to disable Windows web search right now. No, don’t go anywhere! It’s not as easy as flipping a switch – not even in the EU where we generally speaking don’t get as much of the weird stuff as they do in the US.
Luckily, there is a simple way to get rid of Windows web search with a few registry tweaks. Just follow the steps on this page and you’ll have a fast and clean search menu that only shows results from your PC. No more Bing, no more MSN, no more nonsense. Just pure, local, and private(?) search.
Trust me, you’ll thank me later. This is one of the best things you can do to improve your Windows experience. Stop letting Microsoft dictate how you use your PC and take back control of your search. Disable Windows web search today and never look back.
Solution
This guide should work for both Windows 10 and Windows 11. If you’re like me and did some googling (sorry, I meant “BINGING” in case someone from Microsoft is reading this!) first and saw all kinds of registry hacks that were supposed to help – but didn’t – fear not! This one does.
Or it did for me. Hopefully it’ll work for you too.
Let’s get to it:
1. Open regedit
You could search for “registry editor” on Start Menu, but if you haven’t disabled web results yet, that’ll be slow and probably just redirect you to a 2019 MSN news piece about British License Plates being stolen, opened in Edge of course. So you might just as well not do that.
Instead, we’ll hit Windows key + R, and enter “regedit“.

And then we’ll accept the fact that we’re making changes to our system, because that’s exactly what we want to do.

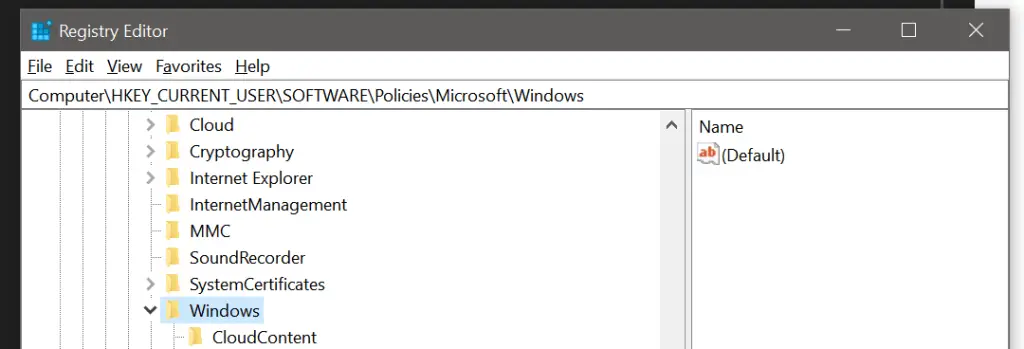
After which we should get Registry Editor to open.
2. Navigate to HKEY_CURRENT_USER\Software\Policies\Microsoft\Windows
You can do this conveniently by hitting F4, then CTRL+A (sometimes you need to do that twice) and then pasting the path in the address bar (CTRL+A should’ve selected the text so you can overwrite it) and hitting Enter.
Here’s the path, once more:
HKEY_CURRENT_USER\Software\Policies\Microsoft\Windows
3. Create a Folder called “Explorer”
You’ll need a folder called “Explorer” under “Windows”. You might already have it (the folder, or “Key” as it’s called in the registry editor), but in case you don’t, feel free to create one.
4. Create a new DWORD registry key
Name it “DisableSearchBoxSuggestions” and set its value to “1”. Without quotes, of course.
So here’s what you’re supposed to have at the end of the day:

5. Restart your machine
And now we’ll get to do the classic Windows thing. Reboot your machine. And after that, you should have a much, MUCH faster Start Menu experience.
Et voila! Now when you search for “Wahtsapp” the next time, the mispelling won’t bring up Bing in Edge – it’ll bring up WhatsApp. Just like Zuck meant it to be.

References
Tom’s Hardware has a great write-up on this :)
https://www.tomshardware.com/how-to/disable-windows-web-search


